

Built a powerful Revit-Dynamo configurator designed to tackle the urban housing challenge by enhancing existing buildings. The tool automates the design and implementation of architectural “Transfer Zones” — from converting windows into Juliet balconies to creating communal rooftop spaces. By integrating a user-friendly interface with a robust Python-driven logic engine, this tool streamlines the architectural workflow, enabling rapid and efficient revitalization of urban housing stock.
Rather than redrawing each intervention by hand, the architect selects a building — or the entire project — from a dialog, chooses the type of transfer zone, and the tool resolves the rest: which elements to harvest, which families to swap, where stairs are needed to reach a roof, and how each new element binds back into the Revit model.
- RevitLive database · design canvas · parametric framework
- DynamoOrchestrator · user interface · data funnel
- PythonLogic engine · API communicator · transaction manager
- Type
- Group project — six people
- Team
- Marie Al Helou, Hrithik Shetty, Aashish Singh, Bo Schneider, Nitesh Shrestha, Sanyam Jain
- My role
- Configurator scripting — the window and roof transfer zones
- Collaboration
- Goldbeck GmbH, Bielefeld
- Supervision
- M. Arch. Linda Selge
- Reference projects
- Goldbeck Aschaffenburg and Heilbronn
- Course
- TH OWL — MID Computational Design, summer 2025
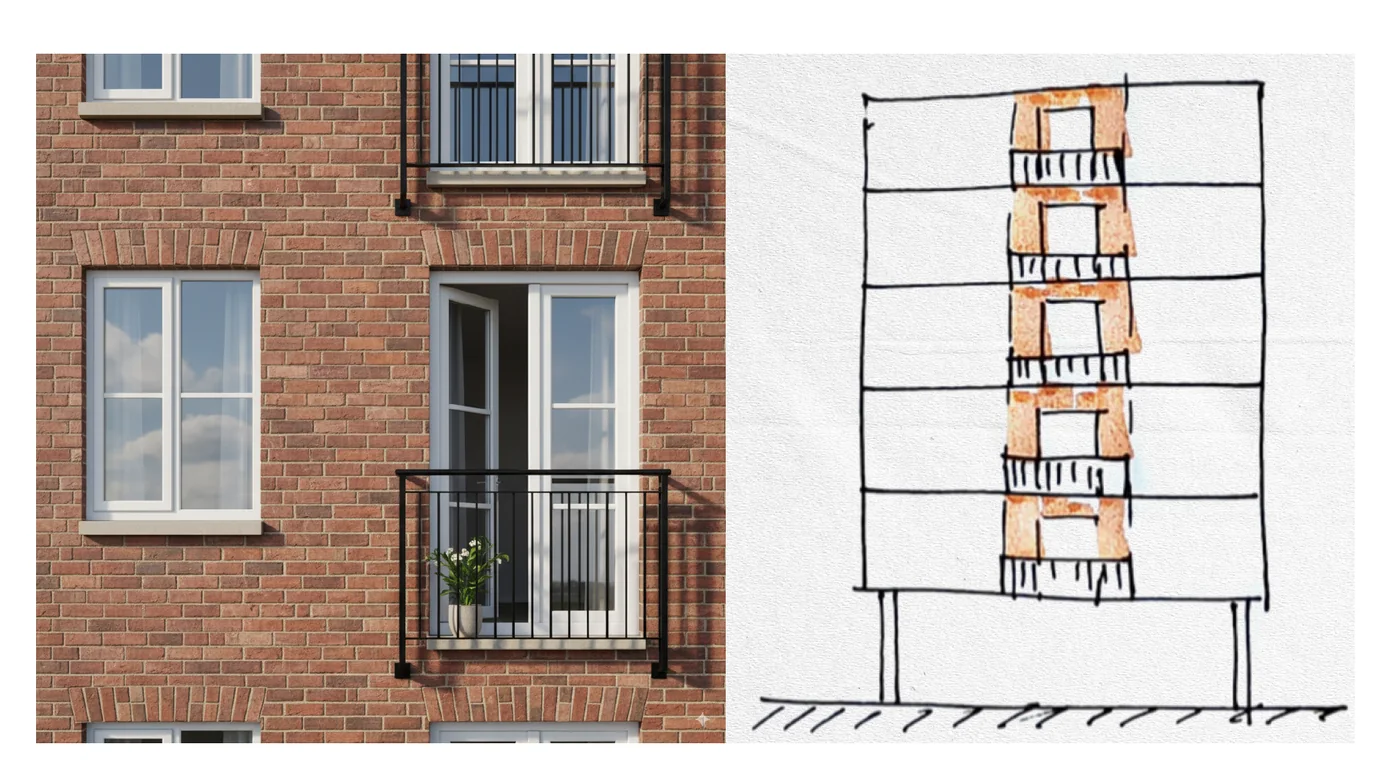
The brief
Cities answer a housing shortage by building denser: replacing, converting, closing the gaps between blocks. Each of those moves takes outdoor space away from the people already living there. A transfer zone is the architectural answer — the threshold between inside and outside, a balcony or a terrace or a bridge, which gives back some of what density removes.
Goldbeck set the year’s task: build a configurator that helps an architect and their client design transfer zones for buildings that already exist, within building regulations and an element-based construction system. Not a renderer, and not a form generator — a decision tool that produces a real Revit model at the end.
What the survey said
The team ran interviews and census research before drawing anything. Five findings shaped the tool.
- A private balcony is a top priority in housing choice
- People pick neighbourhoods that match their values
- Visual quality of the surroundings matters
- Moving somewhere more urban costs you social life
- There is real demand for community-oriented housing
Three ways to add one
The research phase settled on three families of intervention, each a different relationship to the existing envelope.
Building to outside. Convert an existing window into a larger opening and hang a balcony off it — bolt-on or cantilevered, in lightweight steel or aluminium, some with planting integrated. The opening itself becomes a moving wall: folding glass doors, a sliding panel that disappears into a pocket, or foldable timber shutters in front of the glazing. Detailing was worked through real systems rather than invented, down to sill and interlock sections.
A second skin. A facade structure wrapped around the building, adding depth and character to a blank envelope while carrying the new zones.
Building to building. Platforms spanning the gap between two blocks — lightweight bridges on steel trusses or tension cables, floored in glass or perforated metal so light still reaches what is underneath, reached by ramp so they stay accessible, and planted as shared gardens.
Where a zone is allowed
The configurator does not offer every surface. A candidate has to survive a geometric test first.
- 01 — CoreStaircases first, where circulation already exists
- 02 — CommonShared passages and sky bridges
- 03 — BalconiesPer flat, where a threshold is already implied
- 04 — LivingWohnen, Essen, Küche — the shared rooms of a flat
- 05 — PrivateSchlafen and Zimmer, last
For a building-to-building zone the rule is explicit: two faces must be perpendicular to one another and at least six metres apart. Fail either and the space is never offered as a candidate.
The back-end pipeline
Every run of the configurator follows the same five stages, so adding a new type of transfer zone means extending the logic engine rather than rebuilding the tool.
- 01 — User inputConfigurator UI, selection scope, preset design choices
- 02 — Data extractionHarvest element IDs, project categories and families, local and global parameters
- 03 — Computational logicConditional rule-based checks, CPython script using the Revit API
- 04 — Geometry generationCreate elements with Dynamo nodes, replace family types with updated parameters
- 05 — Bake into RevitDisable element binding, place family instances through a Python transaction
Design goals
- Intelligent automation
- Project scalability
- Data-driven precision
- Design versatility
- Rapid exploration
- Robust reliability
The interface, one decision at a time
The dialog is deliberately short. An architect answers four questions and never touches the graph underneath — scope, then zone type, then which elements, then what goes on them. Each screen previews what it is about to do before anything is written to the model.
The interface itself is built with Data Shapes, which turns a Dynamo graph into a Windows form. That choice is what lets the tool be handed to somebody who has never opened Dynamo.
Two zones shipped
- Window transfer zone
- Roof transfer zone
The window zone converts an existing opening into a balcony or a Juliet; the roof zone activates a flat roof as shared space and builds the stair to reach it.


The part that thinks
A rooftop is only a transfer zone if people can get to it. Before the configurator places a single planter it asks a harder question: does any existing stair actually reach the roof slab?
If the answer is no, the tool does not report a problem — it builds the access. It is the difference between a tool that decorates a model and one that completes it. Reduced to its logic, the routine is five lines long:
>> select building;
>> [check]:
>>> if stairs reaches roof level;
>>> if not:
>>>> Build stairs access to roof level;
Revit API
- Stairs · TopElevation
- GetStairsRuns
- GetFootprintBoundary
- get_BoundingBox
- Create.NewOpening
- ElementTransformUtils.CopyElement
- TransactionManager
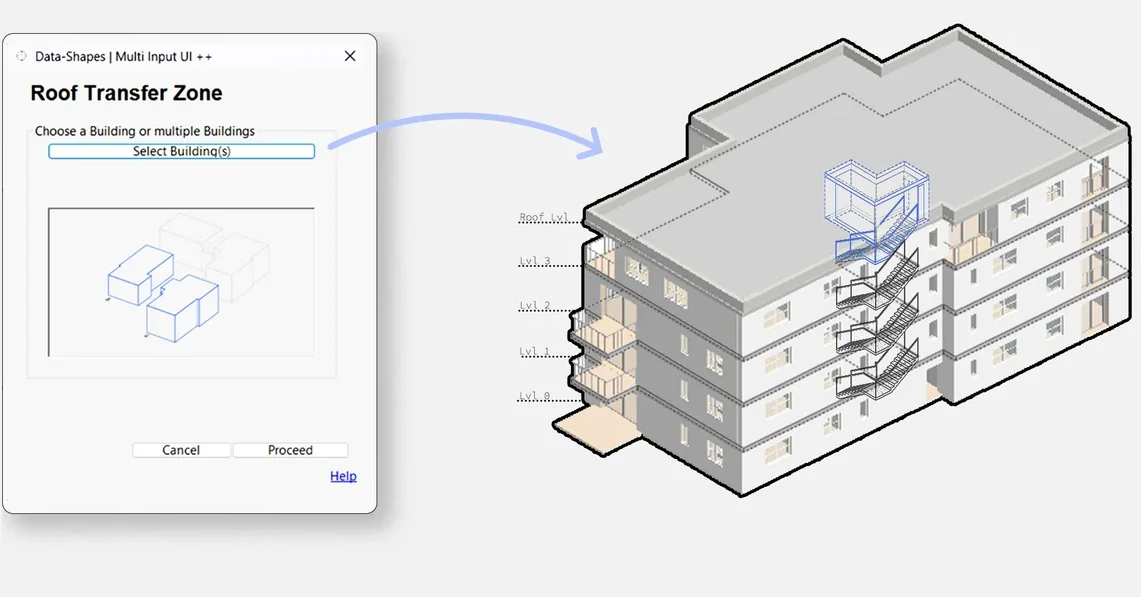
Is the stair short?
The routine is one Python node in the graph, STAIR_REACH_ROOF_3.0, and it works on every selected building at once. For each group it picks the highest roof — or, where a group has no roof, its highest floor — and the highest stair, then asks a single geometric question: does the top of that stair sit below the underside of the slab it should arrive at?
Comparing against the bottom of the slab’s bounding box rather than a level’s nominal height is the choice that matters. A roof’s level says where it was drawn; its geometry says where it actually is, and only the geometry decides whether someone can walk out onto it.
def check_stair_reaches_host(stair, host_element):
    """Checks if the stair's top is geometrically below the host element (roof or floor)."""
    try:
        stair_top_elevation = stair.TopElevation
        host_bbox = host_element.get_BoundingBox(None)
        # Use the bottom of the host's geometry for the check
        host_bottom_elevation = host_bbox.Min.Z

        # Returns True if action is needed (stair is below host)
        return (stair_top_elevation + 0.01) < host_bottom_elevation
    except Exception as e:
        return True # Assume action is needed if check fails
Cut, then copy
When the stair falls short, the changes happen inside one Revit transaction, opened here and closed at the end. Both outcomes start out as failures and are only marked a success once they have actually happened, so what the Watch node reports is what the model got.
Before cutting anything, it checks the roof for a comment. A slab that already carries one has been through this before, and is left alone — so running the graph a second time never cuts a second hole through the same roof.
Otherwise the stair’s run footprints, already projected up to the roof’s elevation, are gathered into a curve array and cut through the roof as an opening — the exact shape of the stair below. The roof is then tagged StairOpeningCreated, which is the comment the check above looks for.
Only if the opening was made is the top flight copied up through it, by the height between its top level and the roof’s level, and re-pinned to those two levels so Revit treats it as a stair in its own right rather than a moved duplicate. No hole, no stair: the model never ends up with a flight rising into a solid slab.
Then the transaction closes, and the whole change lands in the model as one step.
    # Execute changes
    try:
        TransactionManager.Instance.EnsureInTransaction(doc)

        opening_result = {"Success": False, "Message": "No opening created."}
        stair_copy_result = {"Success": False, "Message": "No stair copied."}

        # Action 1: Create the opening in the host element
        opening_created = False
        if footprint:
            # Check if host element already has a comment (indicating it was processed before)
            if has_comment(host_element):
                opening_result = {"Success": False, "Message": "Host element already has a comment - skipping opening creation."}
            else:
                curve_array = CurveArray()
                for curve in projected_curves:
                    curve_array.Append(curve)
                opening = doc.Create.NewOpening(host_element, curve_array, True)
                # Add comment to host element to mark it as processed
                add_comment(host_element, "StairOpeningCreated")
                opening_result = {"Success": True, "Message": "Opening created successfully.", "Id": str(opening.Id)}
                opening_created = True

        # Action 2: Copy the stair up to the host level (only if opening was created)
        if opening_created:
            copied_stair, message = copy_stair_to_host_level(highest_stair, host_element)
            if copied_stair:
                stair_copy_result = {"Success": True, "Message": message, "Id": str(copied_stair.Id)}
            else:
                stair_copy_result["Message"] = message
        else:
            stair_copy_result["Message"] = "Stair not copied - no opening was created."

        TransactionManager.Instance.TransactionTaskDone()
One more detail makes it safe to run on a real model. With the Run switch off, the routine only previews: every building reports what it would do, and the projected footprints are drawn in Dynamo without the model being touched.
Four routines behind the graph
Most of the work is not geometry. It is getting Revit to accept the geometry, keep it, and tell you what happened — four small problems that each took longer than the modelling.
Hurdles
- Dynamo ↔ Python ↔ Revit API
- A workflow across Dynamo, Revit, VS Code and Git
- Usable and still customisable
- Anchor points for the facade design


